Author: Charlie

  • ScriptMate

    ScriptMate

    Overview

    For my final year project at the University of Salford, I set out to design a mobile app that helps amateur actors and directors make the most of their rehearsal time. The result was ScriptMate – a rehearsal assistant app that supports line learning, group collaboration, and performance preparation.

    Inspired by my own experiences in amateur theatre, I wanted to solve a real problem: how can actors learn their lines more efficiently and directors run rehearsals effectively, even when cast members are absent?


    The Challenge

    Amateur theatre groups often face:

    • Low rehearsal attendance due to busy schedules.
    • Actors underprepared, spending more time on line learning than performance.
    • Directors unable to rehearse full scenes when cast members are missing.

    The aim was to create a tool that:

    • Helps actors learn lines faster and smarter.
    • Enables directors to share scripts and feedback digitally.
    • Brings the company together in one organised space.

    Research & Insights

    I began by reviewing existing tools:

    • coldRead – strong transcription features but no collaboration.
    • Line Learner – useful playback options but clunky UX.
    • Facebook Groups – commonly used for communication, but cluttered and unfocused for rehearsals.

    Key takeaway: actors needed line learning + collaboration in one app, not spread across multiple tools.


    Designing ScriptMate

    Branding & Style

    • Name: ScriptMate – a supportive “partner” for rehearsal.
    • Fonts: Novel Sans Pro (modern, book-like feel) + Courier (industry-standard for scripts).
    • Colours: Purple inspired by theatre seats, with greys and accents for depth.
    • Logo: A highlighted line, symbolising focus and annotation.
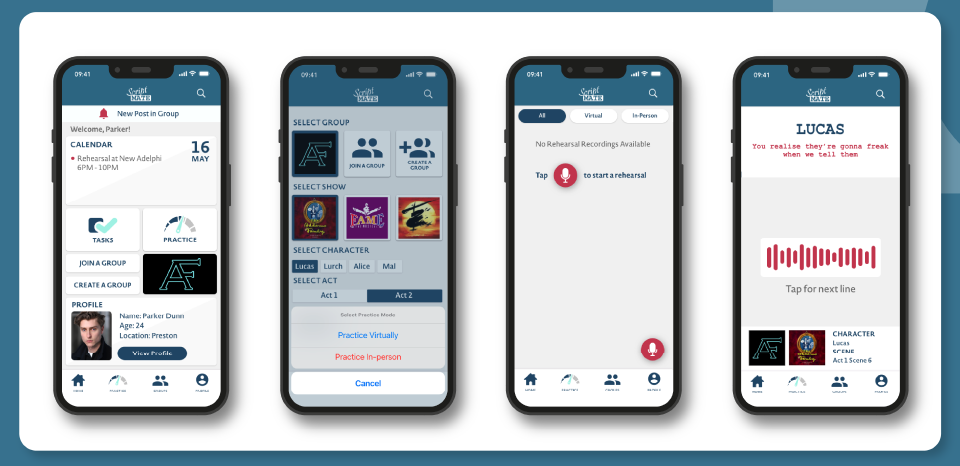
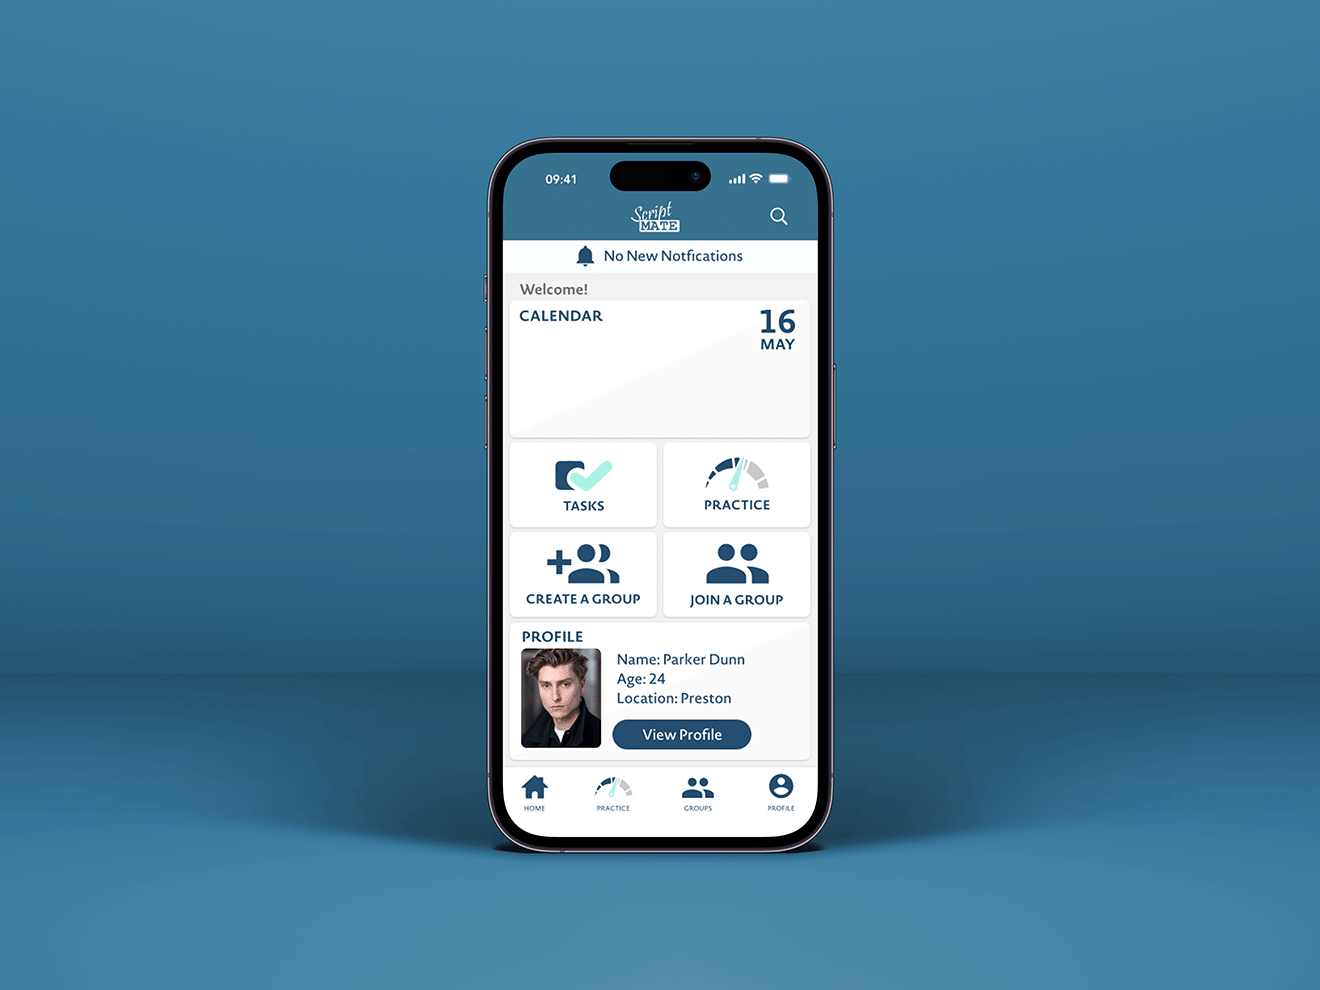
    ScriptMate Initial colour pallette
    ScriptMate Final Colour Pallette

    Core Features

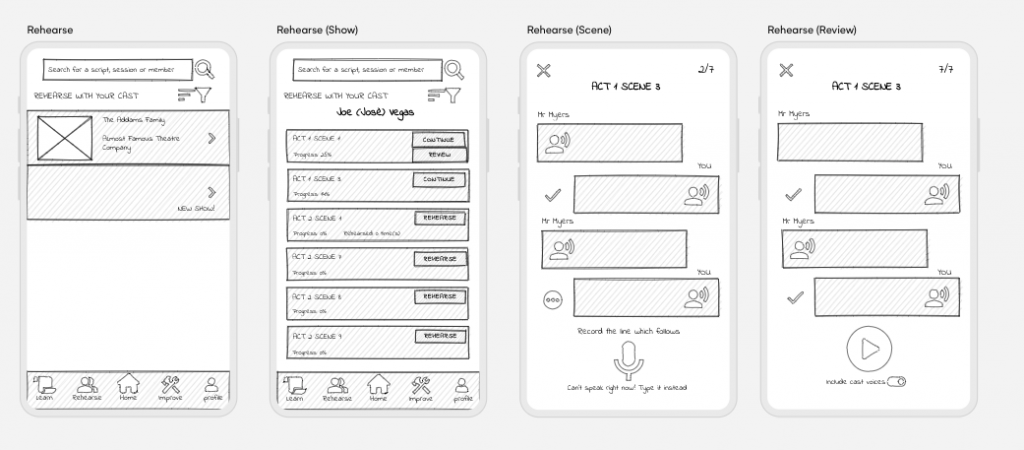
    • Practice Mode – combines learning, rehearsing, and improving lines with playback & transcription.
    • Rehearsals – run scenes line-by-line with an automated voice or live with cast members online/offline.
    • Tasks – Kanban-style board to track progress (To Do → In Progress → Done).
    • Groups – central hub for cast/crew to share scripts, notes, and messages.
    • Calendar – plan rehearsals, auditions, and performances.
    • Profiles – actor details + saved recordings, potentially useful for casting agents.

    Wireframing & Prototyping

    • Started with low-fi wireframes → refined into high-fi prototypes in Adobe XD.
    • Iterated the homepage design several times: from monochrome layouts to a more balanced, colourful iOS-inspired interface.
    • Developed consistent reusable components for smoother UX.
    Lo-fi Wireframes for the rehearsal section of the app
    Lo-fi Wireframes for the rehearsal section of ScriptMate
    Current iteration of rehearsal section of ScriptMate

    User Testing

    I ran a testing session with 10 actors.
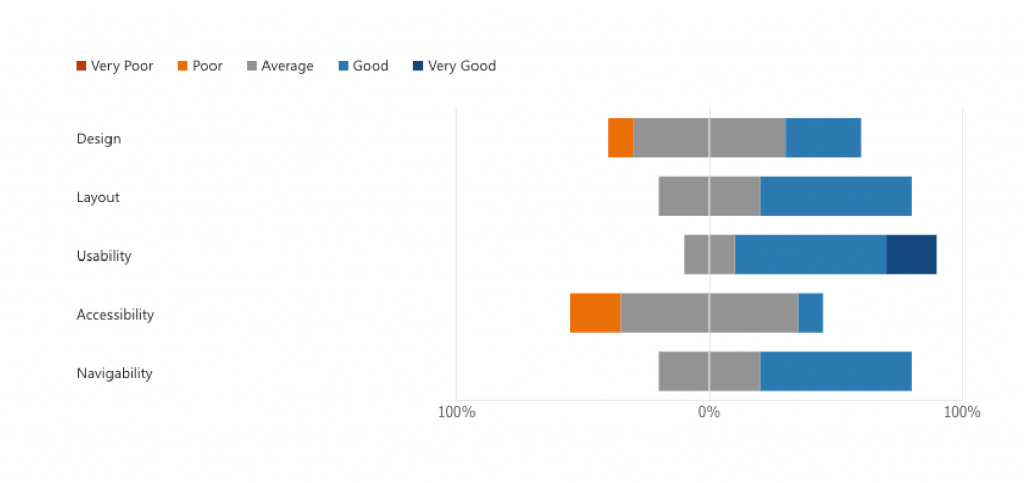
    Findings:

    • Layout, usability, and navigation rated Good.
    • Biggest critique: colour scheme was too flat and heavy.

    Improvements Made:

    • Introduced accent colours and refined UI depth.
    • Simplified menus and streamlined navigation.
    • Merged “Learn / Rehearse / Improve” into one Practice flow for clarity.

    Outcomes

    The final ScriptMate prototype allows users to:

    • Learn and rehearse lines with transcription and playback.
    • Run group rehearsals online or in person.
    • Stay organised with tasks and calendar.
    • Collaborate in cast groups and share recordings.

    Feedback on the final iteration was very positive, especially around usability and visual improvements.


    Reflection & Next Steps

    This project taught me the value of iteration and feedback – my initial designs were functional, but constant testing and critique pushed them to a more professional standard.

    Key learnings:

    • Following iOS design standards elevated the app.
    • Colour psychology and spacing dramatically improved usability.
    • Time management is crucial in UX projects (and I’ll design in Figma from the start next time!).

    Future Development Ideas:

    • Add custom scripts for new writing and auditions.
    • Assign tasks directly to cast members.
    • Live rehearsals with hidden line prompts.
    • More accessibility options (typed line input, multiple playback voices).

    Prototype & Demo

    View Prototype in Adobe XD


    ScriptMate was more than just a final year project – it was an opportunity to merge my love of theatre with UX design, and create something that could genuinely support actors and directors in their creative process.

  • Hope Mill Theatre

    Hope Mill Theatre

    Overview

    For my university module Negotiated Brief, I collaborated with Hope Mill Theatre, an independent venue in Manchester, to create a detailed 3D digital recreation of their performance space.

    The aim was to explore how 3D design could enhance the theatre experience — providing an accurate, interactive representation of the venue for future use in planning, marketing, and virtual experiences.

    This project combined my interests in theatre and 3D design, challenging me to bring a real-world space to life through precise modelling, lighting, and texturing.


    The Challenge

    I wanted to develop a 3D model that not only looked realistic but could also serve as a practical digital asset for the theatre. The goals were:

    • Build an accurate digital version of Hope Mill Theatre from floor plans.
    • Develop my architectural modelling and scaling skills in Blender.
    • Learn how to apply realistic materials using Adobe Substance.
    • Prepare the model for future use in Unity or interactive applications.

    The biggest challenge was interpreting architectural floor plans and photographs to create a 3D space that matched the physical theatre — without being able to visit the venue in person.

    Hope Mill Floor Plan in Blender

    Design & Development Process

    1. Floor Plans & Setup

    I began by importing the theatre’s floor plans into Adobe Illustrator, simplifying them into vector shapes for clean import into Blender. This allowed me to extrude walls and structures to precise heights using elevation drawings as reference.


    2. Architectural Modelling

    In Blender, I modelled the theatre’s key structural features, walls, arches, rigging, lintels, and girders, ensuring each element matched real-world measurements. I used modifiers like array and mirror to replicate recurring components such as arches and light rigs efficiently.


    3. Materials & Texturing

    Using Adobe Substance, I created and applied realistic materials including old brick, wood, black metal, and aged steel. These textures helped capture the venue’s industrial character and ensured a high level of visual authenticity.


    4. Seating & Details

    I sourced a base chair model online, adjusted it for accuracy, and duplicated it using array modifiers to reflect the real seating layout. Additional details such as pipes, lighting, and roof elements were added to complete the environment.

    Hope Mill Theatre Chairs
    Hope Mill Theatre Chairs

    5. Lighting & Rendering

    Basic lighting setups were tested to replicate how light interacts within the real venue. I rendered preview shots to assess realism and make final texture adjustments.


    Outcomes

    The final product was a highly detailed 3D model of Hope Mill Theatre, accurately reflecting its physical space and materials.

    Deliverables included:

    • A fully modelled and textured environment in Blender.
    • An FBX export ready for import into Unity or other 3D platforms.
    • A video walkthrough demonstrating the space and highlighting key details.

    This model gives Hope Mill Theatre a foundation for future digital applications, such as interactive venue tours or metaverse-based events.


    Reflection & Next Steps

    This project was a major step forward in my 3D design practice, helping me refine skills in:

    • Architectural accuracy and scale translation.
    • Efficient modelling workflows in Blender.
    • Realistic material creation and lighting.

    If given more time, I would have:

    • Imported the model into Unity for interactive exploration.
    • Added user movement controls and lighting presets.
    • Integrated UI elements showing live venue measurements.

    Despite its challenges, this project taught me valuable lessons in scope management, client collaboration, and technical precision. The result is a professional, adaptable 3D representation that showcases how digital media can support the performing arts.

    hope mill theatre interior shot from the audience
    hope mill theatre interior shot from the audience
    recreated hope mill theatre interior shot from the audience
    recreated hope mill theatre interior shot from the audience

    This case study demonstrates my ability to combine 3D modelling, design accuracy, and storytelling, creating digital spaces that bridge creativity and functionality.

  • Interactive 3D Bedroom Environment

    Interactive 3D Bedroom Environment

    Overview

    For my university module Enhanced Digital Innovations and Technologies, I created an interactive 3D bedroom environment using Blender and Unity. The aim was to test my modelling, lighting, and interaction skills in a real-time environment while exploring the potential of immersive digital spaces.

    This project challenged me to move beyond static models and bring an environment to life with interactivity, lighting effects, and animation.


    The Challenge

    I wanted to build an environment that was visually realistic but also interactive. The goals were:

    • Strengthen my 3D modelling skills in Blender.
    • Learn how to build immersive spaces in Unity.
    • Experiment with C# scripting for interactive elements.
    • Create an environment that felt modern, minimal, and lived-in.

    I considered three ideas: a theatre, a home studio, and a bedroom. I chose the bedroom because it struck the right balance between ambition and feasibility.


    Design & Development Process

    1. Environment Modelling in Blender

    • Built the room layout with correct mesh topology.
    • Created core furniture: bed, wardrobes, bedside tables.
    • Used modifiers (mirror, subdivision, array) to speed up construction.
    • Added details like a feature wall, shelving, and TV slot.
    Early room mesh
    Early room mesh

    2. Adding Materials & Lighting

    • Applied realistic textures for wood, fabric, and walls using AmbientCG assets.
    • Experimented with spotlights, bedside lamps, and a central room light.
    • Adjusted reflections with reflection probes for realism.
    • Rendered early versions in Blender to preview mood and lighting.

    3. Unity Import & Interactivity

    • Imported Blender models into Unity, fixing material translation issues.
    • Used C# scripting to add:
      • A working light switch (toggle on/off).
      • A moving TV rising from the bed when the player approached.
      • A video player to stream content on the TV screen.
    • Implemented colliders and navigation so the player could explore the space.

    4. Detailing & Polish

    • Designed realistic bedding (duvet + pillows) using physics in Blender.
    • Decorated the room with plants, artwork, and imported models.
    • Tweaked lighting intensities, reflections, and post-processing to set the right mood.

    Outcomes

    The final product was a modern, interactive bedroom environment where the user could:

    • Explore in first-person view.
    • Interact with the light switch.
    • Watch a TV that emerges from the bed and plays video content.
    • Experience a realistic space with textured bedding, furniture, and mood lighting.

    Feedback on the demo highlighted the immersive atmosphere and functional interactivity, though I identified future improvements such as animating wardrobes and adding more decorative elements.

    Room Render

    Reflection & Next Steps

    This project significantly improved my confidence with:

    • Blender modelling workflows (mesh topology, physics, modifiers).
    • Unity lighting and materials.
    • C# scripting for interactivity.

    If I had more time, I would:

    • Add interactive wardrobes with mirrored doors.
    • Improve lighting dynamics further.
    • Expand into adjoining rooms (bathroom, games room).

    Overall, this was a rewarding project that showed me the potential of combining 3D modelling, real-time rendering, and interactivity.


    Demo


    This case study demonstrates how I can conceptualise, design, and implement immersive environments, bridging 3D design and interactive technology.

  • Jack Grealish

    Jack Grealish

    Overview

    For my university module Digital Design, I created a motion graphic celebrating footballer Jack Grealish and his career so far.
    The brief required producing a 90-second digital storytelling sequence using Adobe After Effects, exploring narrative through motion.

    This project combined my interests in sport and design, pushing me to create a visually engaging video that blended footage, typography, and animation to tell the story of Grealish’s career journey.


    The Challenge

    The goal was to design a cohesive motion sequence that showcased key moments from Jack Grealish’s career using strong pacing, rhythmic editing, and smooth transitions.

    My main objectives were to:

    • Develop storytelling through typography, transitions, and sound.
    • Build my After Effects skills (masking, trim paths, motion tracking, and compositing).
    • Sync animation to music for impact.
    • Create a clear visual style and tone fitting Grealish’s energy and personality.

    Design & Development Process

    1. Planning & Storyboarding

    I began by sketching out a storyboard to structure the video’s flow — including key scenes, transitions, and on-screen text.
    This helped identify which assets I needed to create and gather, saving time later when compositing.

    Storyboarding Jack Grealish motion graphic
    Storyboarding Jack Grealish motion graphic

    2. Asset Building

    I prepared visual assets in Photoshop and Illustrator, including cut-outs of Grealish and team logos.
    Initially, I experimented with masking footage to reveal text in rhythm with the beat, but later restructured the opening to create a smoother montage sequence.

    Finding the right soundtrack was essential to match the tone. I chose “Changes” by Overpass, a Birmingham-based band (Grealish’s hometown), to set a powerful, local tone.
    I synced transitions and animations to the beat to maintain momentum.

    Jack Grealish images in Adobe After Effects

    3. Refining the Opening

    After early feedback, I replaced my initial photo montage with a graphic built from Grealish’s shirt number.
    The number “10” then transitioned into his £100 million transfer fee — an engaging, symbolic opening that established tone and visual energy.

    I re-storyboarded the sequence to reflect this new concept, which allowed me to introduce narrative meaning through design — connecting his identity to his success visually.

    Jack Grealish Shirt Frame in Adobe After Effects
    Jack Grealish Shirt Frame in Adobe After Effects

    4. Animating Key Scenes

    Each section of the video corresponded to a major chapter in Grealish’s career.

    • Club Statistics: Overlays and blur effects highlighted career data from Aston Villa, Notts County, and Manchester City.
    • Three-Badge Transition: I merged three club badges into the England crest, symbolising his progression from club football to representing his country.
    • England Montage: I used masking and careful camera focus to keep the football as the viewer’s visual anchor through multiple shots — a key storytelling device that guided attention naturally.
    Grealish Teams Badges in Adobe After Effects
    Jack Grealish, teams played for badges in Adobe After Effects

    5. Advanced Motion & Effects

    Midway through production, I began implementing more advanced After Effects techniques:

    • Trim Paths to animate line drawings and text reveals.
    • Tracking Data to attach Illustrator graphics (like fireballs and explosion effects) to moving football footage.
    • Mask Transitions to move seamlessly between shots, such as footage emerging through text or badge shapes.

    One example involved using a fireball graphic to track the ball’s movement, ending in an explosion synced to a goal — adding cinematic energy.
    Another used floating blue hearts transitioning to Manchester City statistics, matching tone and colour branding.

    Jack text overlay in Adobe After Effects

    6. Final Sequence

    The video concludes with Grealish’s Manchester City reveal, slowed for dramatic effect.
    A masked transition from his shirt badge leads into a final shot of Grealish looking upward as his signature (“Jack”) is animated using trim paths — closing the video on a personal, emotional note.

    Jack Grealish final frame signature
    Jack Grealish final frame signature

    Outcomes

    The finished motion graphic combines:

    • Dynamic visual storytelling aligned with sound and rhythm.
    • Seamless transitions, animated typography, and symbolism.
    • A clear narrative flow from early career to England debut.

    Watch the final version


    Reflection & Next Steps

    This project allowed me to push my technical and creative capabilities in After Effects.
    I developed strong skills in:

    • Masking and compositing for clean transitions.
    • Tracking and linking Illustrator assets.
    • Trim paths and timing animations with audio.

    If I were to revisit the project, I would:

    • Spend more time on storyboarding and pacing to refine narrative flow.
    • Add more motion-graphics elements to the statistics sections for extra depth.
    • Experiment with colour grading and lighting overlays to unify footage.

    Overall, this project strengthened my ability to combine motion design, narrative, and rhythm — transforming real-world footage into a cohesive digital story.

    This case study demonstrates how I can design, animate, and edit to create impactful visual storytelling through motion graphics.